First C# Program
Structure of a C# Program
एक C# program कई elements (class, interface, delegate, namespace आदि) से मिलकर बना हो सकता है जो programer अपनी आवश्यकता के अनुसार define करता है। लेकिन कुछ code अनिवार्य होता है जो सभी C# programs में लिखा जाना आवश्यक होता है।
C# program का general structure निचे दिया जा रहा है। इस structure में अनिवार्य और ऐच्छिक दोनों तरह के code को दर्शाया गया है। बेहतर रूप से समझाने के लिए अनिवार्य code को bold में show किया गया है।
using System;

namespace YourNamespace
{
   class YourClass
   {
        //Class code here...
   }

   interface YourInterface
   {
       //Interface code here...
   }

   delegate int YourDelegate
   {
       //Delegate code here...
   }

   enum YourEnum
   {
       //Enum code here...
   }

   struct YourStruct
   {
       //Struct code here...
   }

   namespace YourNestedNamespace
   {
       //nested namespace code here...
   }

   class YourMainClass
   {
        static void Main(String[] args)
        {
             //Your program execution starts with code here...
        }
   }
}
C# code में define किये जाने वाले सभी elements के बारे में संक्षिप्त जानकारी निचे दी जा रही है।
Namespace
Program की शुरआत में आप namespace include करते है। मुख्यतः System namespace सभी C# programs में include किया जाता है।
इसके अलावा आप program की शुरुआत में खुद का namespace भी define कर सकते है और बाद में इस namespace को किसी दूसरे program में include कर सकते है। Program में खुद का namespace define करना अनिवार्य नहीं होता है।
Class
एक C# program में एक से अधिक classes define की जा सकती है। लेकिन जिस class में Main() method होता है execution उसी class से शुरू होता है।
Interface
Interfaces द्वारा आप classes को एक structure follow करने के लिए bound कर सकते है। Interface declare करना programer की need पर depend करता है।
Delegate
Delegates के द्वारा आप methods का reference create कर सकते है और उन्हें execute करवा सकते है। Delegate को declare करना programer की need पर depend करता है।
Enumeration Type
Enumeration type द्वारा आप named constants का set create कर सकते है। Enumeration type को declare करना programmer की need पर depend करता है।
Struct
Struct के द्वारा आप एक compound type create कर सकते है। Struct define करना programer की need पर depend करता है।
Nested Namespace
आप खुद के define किये गए namespace के अंदर एक nested namespace भी define कर सकते है।
Main Method
एक C# program में Main() method होना necessary होता है। Main() method ही वह point होता है जँहा से program का execution शुरू होता है। Main method जिस class में define किया जाता है वह main class कहलाती है।
Writing Your First C# Program
निचे एक आसान C# program दिया जा रहा है।
using System;

class HelloReader
{
    static void Main(String[] args)
    {
         Console.WriteLine("Hello Reader!");
         Console.ReadKey();
    }
}
इस program में सबसे पहले System namespace को include किया गया है। System namespace में built in types, classes, interfaces, structs और methods available है जो program को execute करने के लिए necessary होते है। इसलिए System namespace को include करना अनिवार्य होता है।
इसके बाद HelloReader नाम की एक class create की गयी है। इस class के अंदर Main() method define किया गया है। Main method के अंदर Console class के WriteLine method को call किया गया है। यह method console (black color की command prompt की तरह window) पर message और values display करने के लिए प्रयोग किया जाता है।
इसके बाद Console class का ReadKey() method create किया गया है। इस method को call करने से compiler output window को close करने से पहले user से एक key input लेता है। जैसे ही user key press करता है output window close हो जाती है। इस method के प्रयोग से आप output को कितने भी समय तक देख सकते है।
यदि आप ReadKey() method को call नहीं करते है तो output window कुछ seconds के लिए show होगी और close हो जायेगी। हालाँकि इस method का सिर्फ ये ही use नहीं है।
यह एक बहुत ही simple program है। यदि अभी आप इस program को समझ नहीं पा रहे है तो आपको परेशान होने की जरुरत नहीं है। धीरे धीरे जैसे ही आप इन topics के बारे में detail से पढ़ेंगे आपको यह program समझ आ जायेगा।
Executing Your First C# Program
यँहा पर assume किया जा रहा है की आपने Visual Studio Express install किया हुआ है। C# program को visual studio express में execute करना बहुत ही आसान है। हालाँकि यह आप C# command line compiler द्वारा भी कर सकते है।
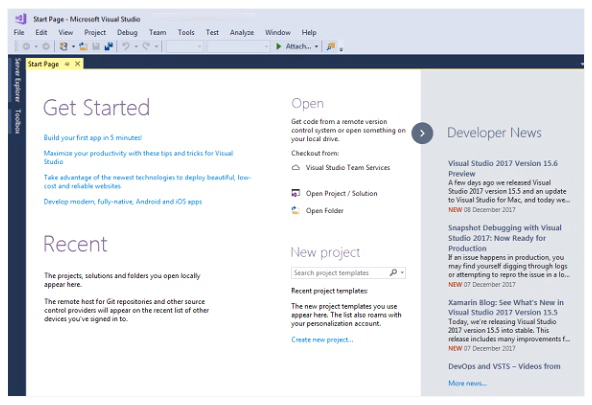
Step 1
सबसे पहले Visual Studio Express start कीजिये। यदि अभी तक आपने Visual Studio Express install नहीं किया है तो आप इसके बारे में विस्तृत जानकारी के लिए Installing Visual Studio Express in Hindi tutorial पढ़ सकते है।
Step 2
Top left corner से File menu पर click करें। इसके बाद New menu select करें और Project पर click करें। इससे new project dialog box open होगा।

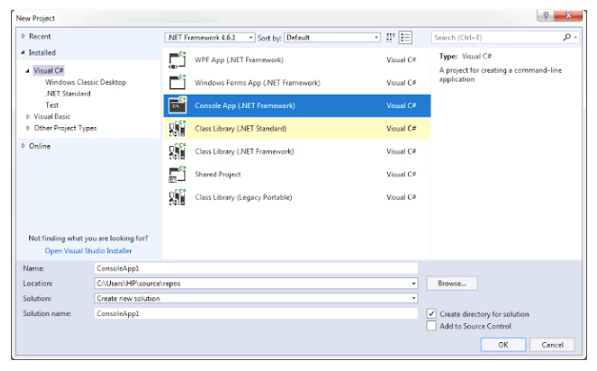
Step 3
New Project dialog box की left side की menu से Installed menu को expend कीजिये। इसके बाद Templates menu को expend कीजिये। इसके बाद Visual C# पर click कीजिये। इसके बाद right side से Console Application option choose कीजिये।
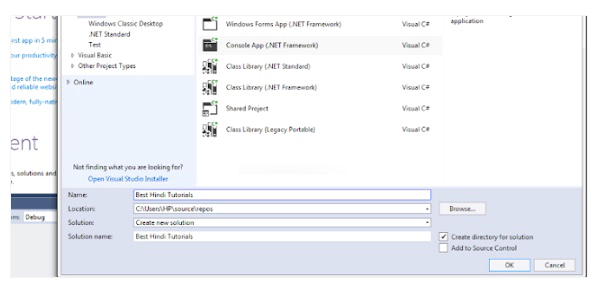
Step 4
इसके बाद Name box में project का नाम लिखिए और OK button पर click करिये। जैसे की निचे दी गयी image में project का नाम Best Hindi Tutorials दिया गया है।
आप चाहे तो location box द्वारा अपने project को different location पर भी save कर सकते है। लेकिन अभी आपको इसे नहीं change करना चाहिए।
Step 5
OK button click करने के बाद right side में Solution Explorer में आपका नया project appear होगा और left side में editor show होगा जिसमे कुछ code होगा। जैसा की आप निचे दी गयी image में देख सकते है।
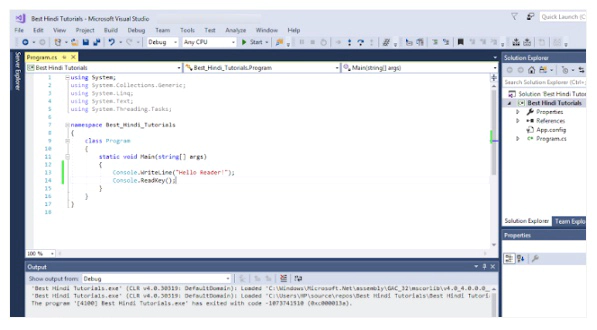
Step 6
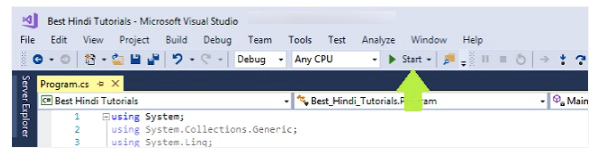
आप चाहे तो editor के code को पूरी तरह replace करके पहले ऊपर बताया गया program code लिख सकते है या फिर इसी code से शुरुआत कर सकते है। Program लिखने के बाद उसे run करने के लिए toolbar में दिए गए green color के start button को दबाइये या फिर F5 key द्वारा भी program को run करवा सकते है।
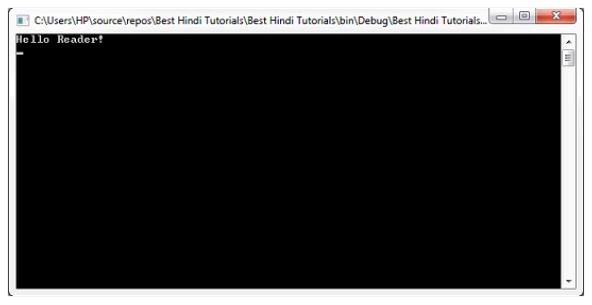
Step 7
Output आपको console window में निचे दी गयी image की तरह show होगा। यदि आपके program में कोई error आती है तो वह आपको editor के निचे list के रूप में show होगी।