HTML Font Tag
Introduction to HTML Font Tag
अपनी website के fonts को configure करके आप उसे और भी attractive, readable और structured बना सकते है। By default आपकी website की font family कुछ भी हो सकती है। लेकिन इसे आप अपनी website के हिसाब से configure करके कोई दूसरी font family भी यूज़ कर सकते है। साथ ही आप font का color भी change कर सकते है।
Fonts को configure करने के लिए HTML <font> tag provide करती हैं। इस tag को आप किसी paragraph पर भी apply कर सकते है और आप चाहे तो किसी paragraph में particular text पर भी इसे apply किया जा सकता है। <font> tag को HTML 5 में include नहीं किया गया है। HTML 5 में इसकी जगह CSS का प्रयोग किया जाता है।
<font> tag के 3 attributes होते है।
size - इस attribute से आप font की size change कर सकते है। Font की size numbers में दी जाती है।
face - इस attribute के द्वारा font family change की जाती है। आप जो font family चाहते है उसे inverted commas में define करते है।
color - ये attribute font का कलर change करने के लिए यूज़ किया जाता है। आप color का hex code लिख सकते है या फिर color का नाम भी दे सकते है।
Setting Font Size
Font की size आप size attribute से define करते है। इसका उदाहरण नीचे दिया जा रहा है।
<html>
<head>
<title>Font size demo </title>
</head>

<body>
<font size="10" > HTML in Hindi</font>
</body>

</html>
ऊपर दी गयी script निचे दिया गया web page generate करती है।

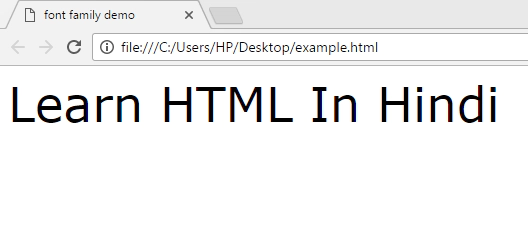
Setting Font Family
Font family set करने के लिए आप face attribute यूज़ करते है। इसका उदाहरण नीचे दिया जा रहा है।
<html>
<head>
<title>font family demo</title>
</head>

<body>
<font size="10" face="Verdana">Learn HTML In Hindi</font>
</body>

</html>
ऊपर दी गयी script निचे दिया गया web page generate करती है।
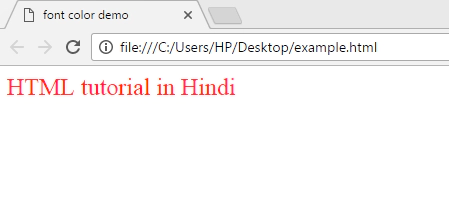
Setting Font Color
Font का color आप color attribute से change करते है। इसका उदाहरण नीचे दिया गया है।
<html>
<head>
<title>font color demo </title>
</head>

<body>
<font color="red">HTML tutorial in Hindi</font>
</body>

</html>
ऊपर दी गयी script निचे दिया गया web page generate करती है।
Commenting in HTML
कई बार ऐसा होता है की एक developer के द्वारा लिखी हुई script को दूसरे developers भी यूज़ करते है। इसलिए उस script को explain करना necessary हो जाता है ताकि दूसरे developers को आपकी script यूज़ करने में कोई problems ना हो।
Script को explain करने के लिए आप comments को यूज़ कर सकते है। HTML में comments define करना बहुत ही आसान है। Comments interpret नहीं होते है। HTML interpreter comments को skip कर जाता है। यानि comments में लिखा हुआ कोई भी text आपके webpage पर कोई भी असर नहीं डालता है। अपनी script लिखते समय comment करना एक बहुत ही professional habit है।
HTML में comments भी tags के द्वारा किये जाते है। इसके लिए HTML आपको एक unique tag provide करती है।
<!-- your comment here -->
इसका उदाहरण नीचे दिया जा रहा है।
<html>
<head>
<title>commenting demo</title>
</head>

<body>

<p> Hello </p> <!-- A paragraph -->

</body>

</html>