Access Control List
Introduction to Access Control List
किसी भी organisation के लिए अपने network को protect करना अत्यंत महत्वपूर्ण होता है। यदि ऐसा नहीं किया जाए तो unwanted traffic और unauthorized access आपके network की स्थिति को ख़राब कर सकते है।
उदाहरण के लिए कोई भी unauthorised access करके आपके organisation के network resources को use कर सकता है और उन्हें damage भी कर सकता है। इसके अलावा आपके network में इतना unwanted traffic flow हो सकता है की उससे आपके network की कार्य क्षमता भी प्रभावित हो सकती है।
इसलिए यह आवश्यक है की आप अपनी organisation के network को secure रखने के लिए प्रयास करें। ऐसा आप अपने network में traffic के flow को control करके कर सकते है। इसे traffic को filter करना भी कहा जाता है। क्योंकि आप केवल authorized traffic को allow करते है और बाकि traffic को block कर देते है।
Basic security feature के रूप में Cisco अपने सभी routers में access control lists के द्वारा traffic control (filter) करने की ability provide करता है। जैसा की नाम से ही पता चलता है access control lists आपके network के access को control करती है। इन्हें simply access lists भी कहा जाता है।
Access lists एक commands की list होती है। कोई भी command या तो traffic allow करती है या deny करती है। यदि access list की किसी command से traffic match कर जाता है तो traffic को permit या deny किया जाता है और यदि traffic match नहीं करता है तो वह discard हो जाता है।
Access lists protocol, interface और direction के आधार पर traffic को filter करती है। आप हर protocol, interface और direction के लिए केवल एक ही access list use कर सकते है।
यह ध्यान रखना बेहद महत्वपूर्ण है की access lists केवल router से pass होने वाले traffic को ही control करती है। यानी की access lists को केवल router interfaces पर ही implement किया जा सकता है।
यदि आप अपने network के अंदर भी traffic को control करना चाहते है तो इसके लिए आपको अपने main router के अलावा network में और भी routers setup करने होंगे।
उदाहरण के लिए आप चाहते की आपके network में कुछ hosts किन्हीं दूसरे hosts से communicate ना कर सके तो इसके लिए आपको उन्हें router से seperate करना होगा और फिर router interfaces पर access lists apply करनी होगी।
Operations of Access Control Lists
Access control lists द्वारा 2 प्रमुख operations perform किये जाते है। इनके बारे में आगे बताया जा रहा है।
Traffic Classification (Categorisation)
Access lists द्वारा network में आने वाले और network से बाहर जाने वाले traffic को classify किया जाता है। यानि की Access lists router से pass होने वाले traffic को categories करने में सक्ष्म होती है। इसके कुछ उदाहरण निचे दिए जा रहे है।
- Access lists द्वारा एक routing protocol (IP, TCP, ICMP, OSPF आदि) से दूसरे routing protocol को भेजे जाने वाले traffic को categories किया जाता है।
- Access lists द्वारा VPN tunnel से send किये जाने वाले traffic को categories किया जाता है। यानी की आप VPN tunnel से गुजरने वाले traffic को अलग से identify और control कर सकते है।
- Access lists द्वारा NAT (Network Address Translation) protocol द्वारा translate किये जाने वाले traffic को categories किया जा सकता है।
- Access lists के द्वारा telnet connections को भी filter किया जा सकता है।
Traffic Filtering (Control)
Access lists का सबसे प्रमुख कार्य traffic को filter करना होता है। Access lists के द्वारा आप define करते है की किस प्रकार (protocol, interface, port, network) का traffic आपके network में आ सकता है और किस प्रकार का traffic network के बाहर जा सकता है।
कई बार traffic filtering और classification को confuse कर लिया जाता है। लेकिन आपको confuse होने की आवश्यकता नहीं है। आसान शब्दों में कहा जाए तो traffic classification का मतलब pass होने वाले traffic की category क्या है। यानी की वह IP traffic है, TCP traffic, VPN tunnel से आने वाला traffic है या फिर NAT protocol से आने वाला traffic है और traffic filtering का मतलब है की कौनसा traffic router के through pass होगा।
Working of Access Control Lists
निचे access lists की working को steps द्वारा समझाया जा रहा है।
- हर traffic packet हमेशा access list की सभी commands के साथ compare किया जाता है। यह match top से down sequential order में perform किया जाता है।
- Traffic केवल तब तक ही compare किया जाता है जब तक की कोई match नहीं मिल जाता है। एक बार जब traffic किसी command से match करता है तो उस command को execute किया जाता है और या तो traffic को permit या deny किया जाता है। इसके बाद आगे कोई comarision नहीं किया जाता है।
- Access list के आखिर में हमेशा एक implicit deny का command होता है जिसका मतलब यह होता है की यदि traffic किसी भी command से match नहीं होता है तो उसे discard कर दिया जाता है।
Types of Access Control Lists
Access Control Lists दो प्रकार की होती है। इन्हें इनके द्वारा check की जाने वाली information के आधार पर categories किया गया है।
Standard Access Control Lists
Standard access lists द्वारा सिर्फ traffic का source IP address check किया जाता है। यानी की सिर्फ यह check किया जाता है की traffic कँहा से आ रहा है। इस तरह की access list अलग अलग तरह के traffic जैसे की telnet, UDP आदि को classify (classification) नहीं करती है। सभी प्रकार का traffic एक ही बार में permit या deny कर दिया जाता है।
Standard access list 1 से 99 तक के numbers द्वारा create की जाती है। इन्हे create करना बहुत ही आसान है। इसके लिए आप निचे दिए गए steps follow कर सकते है।
- सबसे पहले router को configuration mode में लाया जाता है।
- इसके बाद access-list command define की जाती है।
- इसके बाद वह number define किया जाता है जिससे की router को पता चलता है की access list standard है या नहीं।
- इसके बाद permit या deny command define की जाती है।
- इसके बाद आप चाहे तो any command द्वारा सम्पूर्ण traffic को block या allow कर सकते है या फिर आप host command द्वारा किसी host का ip address भी permit और deny कर सकते है या फिर आप बिना किसी extra command के directly ही किसी host को permit और deny कर सकते है।
- यदि आप एक host के बजाय एक साथ कई hosts को permit या deny करना चाहते है तो इसके लिए आप wild card mask द्वारा define करते है की आप कितने host और subnetworks पर access list को apply करना चाहते है।
- Wild card mask में zero का मतलब network होता है और जिन hosts को आप block या allow करना चाहते है उन्हें 255 द्वारा define किया जाता है।
उदाहरण के लिए निचे दिया गया diagram देखिये। इस diagram में A, B और C 3 networks है।
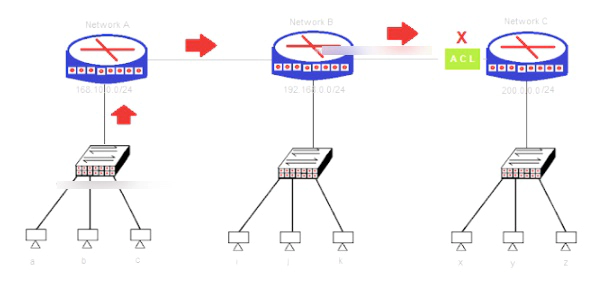
मान लीजिये आप चाहते है की network A का कोई भी host network C को data ना भेज पाए। इसके लिए आपको network C के उस interface पर access list configure करनी होगी जो network B से connected है। ऐसा इस प्रकार किया जा सकता है।
RouterC>enable
RouterC#configure terminal
RouterC(config)#access-list 10 deny 168.10.0.0 0.0.0.255
RouterC(config)#access-list 10 permit any
RouterC(config)#exit
ऊपर दिए गए configuration में सबसे पूर्व router को configuration mode में लाया गया है। इसके बाद access list create करने के लिए access-list command use की गयी है।
इस configuration में access list create करने के लिए 10 number use किया गया है। जैसा की आपको पता है 1 से लेकर 99 तक के numbers द्वारा standard access list create की जाती है। इस range के किसी भी number को use करके आप router को बताते है की आप एक standard access list create करना चाहते है।
इसके बाद deny command define की गयी है और उसके बाद उस network को mention किया गया है जिसके hosts के traffic को आप इस router में enter करने से deny करना चाहते है। Hosts की range को define करने के लिए wild card mask को use किया गया है।
हालाँकि rules के अनुसार access lists के आखिर में implicit deny होना चाहिए लेकिन यदि आप permit any statement देते है तो implicit deny की आवश्यकता नहीं होती है। आखिर में router के configuration mode को exit किया गया है।
एक बात आपको हमेशा ध्यान रखनी है की जब भी आप standard access control list implement करें तो वह destination के करीब होनी चाहिए। ऐसा करने से आप गलती से दूसरे networks के traffic को block करने की गलती से बच जाते है।
Extended Access Control Lists
Extended access control lists किसी भी traffic को permit या deny करने से पूर्व निचे दी गयी information check करती है।
- Source IP Address
- Source Protocol
- Source Port
- Destination IP Address
- Destination Protocol
- Destination Port
Extended access control list traffic पर advanced control provide करती है। इस तरह की access list 100 से लेकर 199 तक के numbers द्वारा create की जाती है।
Standard access list के ऊपर दिए गए उदाहरण में जब access list apply की जाती है तो network A का कोई भी host network C के hosts को data नहीं send कर सकता है। यह सभी तरह के traffic को block कर रही है।
लेकिन मान लीजिये आप network A के सिर्फ उन hosts को block करना चाहते है जो network C को access करने के लिए telnet use कर रहे है और बाकी सभी hosts को आप access allow करना चाहते है। ऐसे में standard access lists द्वारा ये किया जाना संभव नहीं है क्योंकि standard access lists traffic को classify नहीं करती है। ऐसा करने के लिए आपको extended access list का प्रयोग करना होगा।
ऊपर दिए गए network में network C से connect होने वाले सभी telnet connections को block करने के लिए extended access list implement की जाए तो ऐसा इस प्रकार किया जा सकता है।
RouterC>enable
RouterC#configure terminal
RouterC(config)#access-list 110 deny tcp any 200.0.0.0 0.0.0.255 eq 23
RouterC(config)#access-list 110 permit ip any any
RouterC(config)#exit
ऊपर दिए गए configuration में सबसे पूर्व router को configuration mode में लाया गया है। इसके बाद access-list command define की गयी है। इस command के 110 number define किया गया है जिससे router को पता चलेगा की आप extended access list create कर रहे है।
Access list command के बाद deny command दी गयी है जिससे की traffic block किया जाता है। इस command के बाद उस protocol को define किया गया है जिसकी service आप block करना चाहते है। क्योंकि telnet TCP (Transmission Control Protocol) की ही एक service है इसलिए यँहा पर TCP protocol define किया गया है।
इसके बाद any command define की गयी है जो उन सभी source hosts को select करेगी जो की telnet use कर रहे है। इससे कोई फर्क नहीं पड़ता की वह host किस network का है। आप चाहे तो host command द्वारा या directly एक single host को भी define कर सकते है। लेकिन यँहा पर उन सभी hosts को block किया जा रहा है जो telnet connection use करेंगे।
इसके बाद सभी destination hosts को define करने के लिए network address और subnet mask define किया गया है। आप चाहे तो host command द्वारा सिर्फ एक host के लिए भी telnet connection को block कर सकते है।
इसके बाद eq command define की गयी है जो particular service के port number को define करने के लिए use की जाती है। इस configuration में 23 port number define किया गया है जो की telnet connections के लिए use किया जाता है।
Access list की second line में पुरे IP traffic को permit किया गया है और आखिर में exit command द्वारा configuration mode से exit किया गया है।
Directions of Access Control Lists
जैसा की आपको पता है access lists router interfaces पर apply होती है और उस interface से pass होने वाले traffic को control करती है। यह जरुरी नहीं की जिस प्रकार आप अपने network में आने वाले traffic को control करे उसी प्रकार network से बाहर जाने वाले traffic को भी control करें।
इसलिए एक single interface पर दो तरह की access lists को implement करना आवश्यक है ताकि आने वाले और जाने वाले traffic को अलग अलग तरह से control किया जा सके।
Diretion के आधार पर access list दो प्रकार की होती है। इन access lists के बारे में निचे बताया जा रहा है।
- Inbound access list - ये access lists उस traffic को filter करती है जो दूसरे network से आता है।
- Outbound access list - ये access lists उस traffic को filter करती है जो आपके network से बाहर जाता है।
यह बात आपको हमेशा ध्यान रखनी चाहिए की inbound और outbound दोनों तरह की access lists एक ही interface पर apply की जा सकती है लेकिन एक आने वाले traffic को filter करती है और दूसरी जाने वाले traffic को filter करती है।
Named Access Control Lists
यदि आप किसी बड़े network के administrator है तो आपको बहुत सारी access lists को apply करना पड़ सकता है। ऐसे में access lists को manage करना बहुत मुश्किल हो सकता है। क्योंकि एक बार access list को create करने के बाद ये जरुरी नहीं की आपको याद हो की वह access list किस लिए create की गयी थी।
इसके अलावा access lists के numbers को देखकर identify नहीं किया जा सकता है की उस access list का क्या प्रयोजन है। इस समस्या से बचने के लिए आप standard और extended access lists दूसरे तरीके से create कर सकते है। इस तरीके को named access lists कहा जाता है।
Named access lists create करते समय आप numbers define करने की बजाय उस access list का नाम दे सकते है जिससे बाद में देखने पर आप उसे आसानी से identify कर सकते है। इसके अलावा आप remark भी define कर सकते है जिसे पढ़कर उस access list के बारे में अधिक जानकारी प्राप्त की जा सकती है।
Creating Named Access Control Lists
Named access lists का lists का syntax normal access lists से अलग होता है। Named access lists create करना निचे steps द्वारा बताया जा रहा है।
- सबसे पहले ip access-list command define की जाती है। इस command से router को पता चलता है की आप एक named access list create करना चाहते है।
- इसके बाद आप access list का type define करते है। Normal access lists में type numbers द्वारा define किया जाता है। लेकिन named access lists में type standard और extended keywords द्वारा define किया जाता है।
- इसके बाद आप access list का नाम लिखते है और enter press करते है। जैसे ही आप enter press करते है तो router का prompt change हो जाता है। अब आप वह actual commands लिख सकते है जो traffic को permit या deny करेगी।
- Access list की commands को define करने के बाद आप exit command के द्वारा बाहर आ जाते है।
यदि ऊपर define किये गए standard access list के configuration को named access list द्वारा define किया जाए तो वह इस प्रकार होगा।
RouterC>enable
RouterC#configuration terminal
RouterC(config)#ip access-list standard NetworkCAccessList
RouterC(config-std-nacl)#deny 168.10.0.0 0.0.0.255
RouterC(config-std-nacl)#permit any
RouterC(config-std-nacl)#exit
यदि ऊपर दिए गए extended access list के configuration को named access list द्वारा define किया जाए तो वह इस प्रकार होगा।
RouterC>enable
RouterC#configuration terminal
RouterC(config)#ip access-list extended NetworkCAccessList
RouterC(config-std-nacl)#deny tcp any 200.0.0.0 0.0.0.255 eq 23
RouterC(config-std-nacl)#permit ip any any
RouterC(config-std-nacl)#exit
Monitoring Access Control Lists
अपने organization के network को ठीक तरह से operate करने के लिए यह आवश्यक है की आप access list को monitor करते रहे। कुछ ऐसी commands available है जिनके द्वारा आप access lists का configuration देख सकते है और उन्हें monitor कर सकते है।
show access-list
यह command सभी access list की list display करती है। Access lists के साथ उनके configure किये गए parameters भी show किये जाते है। इस list में यह भी show किया जाता है की किसी access list ने traffic को कितनी बार permit या deny किया है। इस list में उस interface का नाम नहीं show किया जाता है जिस पर access list configured होती है।
show access-list number ([1-99],[100-199])
यह command किसी particular access list के बारे में ही information show करती है। उदाहरण के लिए यदि आप access list 10 का configuration देखना चाहते है तो number की जगह 10 लिखेंगे।
show ip access list
यह command router पर configure की गयी सिर्फ IP access list को ही show करता है।
show ip interface
यह command उन interfaces को show करती है जिन पर कोई access list configure की गयी है।
show running-config
यह command interfaces और उन पर apply की गयी access lists को show करती है।