RIP (Routing Information Protocol) configuration
Basic RIP configuration
किसी भी routing protocol को global configuration mode में configure किया जाता है। जब आप RIP को configure करते हैं तो सबसे पहले आप जिस router को configure करना चाहते है उसमें login होकर global configuration mode में enter होते है।
RIP को configure करने के लिए आप सबसे पहले router rip command execute करवाते है। ये command RIP routing process को enable करती है। इस command को execute करने से आप global configuration mode से router configuration mode में आ जाते है। इसे RIP enable command भी कहते है।
RIP हमेशा directly connected routers के बारे में ही दूसरे router को updates भेजता है। ऐसा network command के द्वारा किया जाता हैं। Network command ये बताती है की आप किन directly connected routers को routing updates के द्वारा दूसरे RIP routers के साथ share करना चाहते है। सिर्फ उन्हीं routers के साथ routing information share की जाती है जो network command के द्वारा listed होते है। आइये इस एक उदाहरण से समझने का प्रयास करते है।
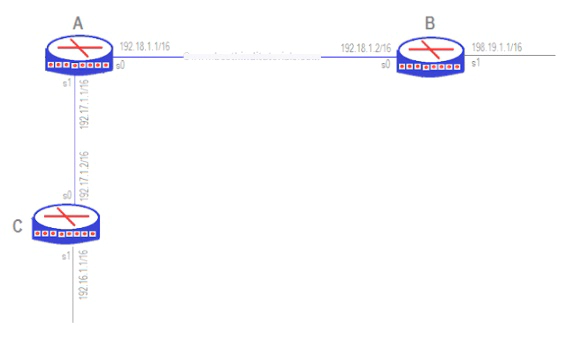
ऊपर दिए हुए diagram को देखिये। इसमें 3 routers है A, B और C। Router A पर आप RIP इस प्रकार configure कर सकते है।
RouterA(config)# router rip
RouterA(config-router)# network 192.18.0.0
RouterA(config-router)# network 192.17.0.0
Router B पर आप RIP इस प्रकार configure कर सकते है।
RouterB(config)# router rip
RouterB(config-router)# network 192.18.0.0
RouterB(config-router)# network 192.19.0.0
इसके बाद Router C पर RIP को इस प्रकार configure किया जायेगा।
RouterC(config)# router rip
RouterC(config-router)# network 192.17.0.0
RouterC(config-router)# network 192.16.0.0
यँहा पर पहले RIP को enable किया गया है, इसके बाद network command के द्वारा ये define किया गया है की किन routers को routing information भेजी जानी चाहिए। एक ध्यान देने योग्य बात ये है की सभी IP addresses class-full boundaries में define किये जाते है और उनके साथ कोई subnet mask define नहीं किया जाता है।
RIP v2 configuration
RIP 2 RIP 1 की limitations को routing updates में subnet add करके overcome करता है। By default routers पर RIP 1 ही enabled रहता है। इसे change करने के लिए आप RIP को enable करने के बाद version command के द्वारा version define करते है।
हालाँकि RIP 2 एक classless protocol है लेकिन फिर भी networks को classful boundaries में बिना subnet mask के define किया जाता है।
Auto-summarization
जब भी कोई router major network से बाहर होता है और इसके द्वारा भेजे गए routes sub-netted (classless boundaries) होते है तो ऐसी situation में RIP इन routes को automatically classful boundaries में summarize करके add करता है। इसे auto summarization कहते है। आप चाहे तो इसे disable भी कर सकते है इसके लिए आप no auto-summary command execute करते है।
यदि ऊपर RIP के उदाहरण को RIP 2 के साथ configure करे तो ऐसा आप इस प्रकार कर सकते है।
RouterA# router rip
RouterA# version 2
RouterA# network 192.18.0.0
RouterA# network 192.18.0.0
इसी प्रकार बाकी routers के साथ भी RIP 2 को configure किया जा सकता है।
RIP timers configuration
जैसा की मैने आपको पहले बताया RIP timers RIP operations को control करने के लिए यूज़ किये जाते है। इनकी default value इस प्रकार होती है।
Update timer - 30
Route timeout timer (Invalid timer) - 180
Hold down timer - 180
Flush timer - 240
आप इन default values को change कर सकते है इसके लिए आप timers basic command execute करवाते है। ये command सभी timers की default values को change कर देती है। इस command के बाद आप ऊपर दिए गए order में timers की values space से separate करके लिखते है। जैसे की
Router(config)# router rip
Router(config)# timers basic 20 80 80 120
यदि आप वापस से default timers को enable करना चाहते है तो इसके लिए आप no timers basic command यूज़ करते हैं।
Router(config)# no timers basic
RIP passive interfaces configuration
Passive routers वो RIP routers होते है जो routing updates सिर्फ receive करते है लेकिन send नहीं करते है। आप किसी भी router के एक particular interface को passive बना सकते है। ऐसा करने से उस interface से कोई भी routing update जाएगी नहीं लेकिन दूसरे RIP router के द्वारा भेजी गई routing updates आ सकती है। उदाहरण के लिए निचे दिए गए diagram को देखिये।
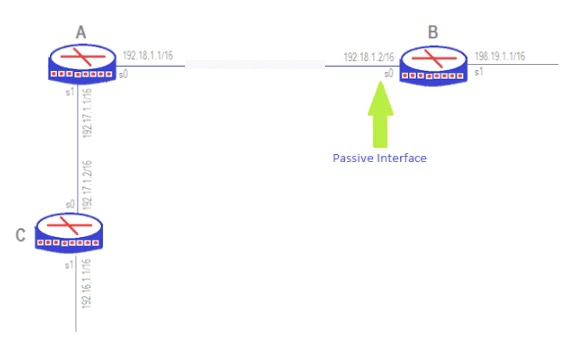
इस example में router B के interface s0 को passive बनाया गया है। अब A को routing updates नहीं भेजी जाएगी। लेकिन router A से routing updates receive की जा सकती है। ऐसा आप passive-interface command के द्वारा करते है। इस command के बाद आप उस interface का नाम लिखते है जिसे आप passive बनाना चाहते है।
RouterB(config)# passive-interface s0
यदि आप किसी router के सभी interfaces को एक साथ passive बनाना चाहते है तो इसके लिए passive-interface command default value के साथ execute करते है।
RouterB(config)# passive-interface default
यदि आप वापस से किसी interface को active करना चाहते है तो no passive-interface command execute कर सकते है।
RouterB(config)# no passive-interface s0
RIP neighbors configuration
By default RIP routing updates को broadcast करता है। लेकिन आप चाहे तो बाकि सब routers को छोड़ कर specific routers को unicast updates भेज सकते है। ऐसा करने से routing updates broadcast नहीं होगी लेकिन specific neighbors को unicast updates भेजी जाएगी। Specific routers को routing updates भेजने के लिए आप उन्हें neighbor command से configure करते है।
RouterC(config)# neighbor 192.17.1.2
RIP v1 and RIP v2 inter-operating configuration
कई बार ऐसी भी situation हो सकती है की एक router RIP v1 use कर रहा है और दूसरा router RIP v2 यूज़ कर रहा है। RIP v1 router सिर्फ RIP v1 packets send कर सकता है। लेकिन receive दोनों तरह के packets कर सकता है और RIP v2 केवल RIP v2 packets को ही send और receive कर सकता है।
ऐसी situation में या तो RIP v1 वाले router को configure किया जा सकता है की वो RIP v2 packets भेजे या आप RIP v2 router को configure कर सकते है की वो RIP v1 packets को receive करे।
मान लीजिए की RouterC RIP v1 को run कर रहा है तो आप इस router को RIP v2 packets भेजने के लिए इस प्रकार configure कर सकते है। ये configuration आप interfaces पर करते है। इसके लिए आप interface configuration mode में enter होते है।
RouterC(config)# interface s0
RouterC(config-if)# ip rip send version 2
आप चाहे तो RouterA जो की RIP v2 रन कर रहा है उसे भी RIP v1 के packets receive करने के लिए configure कर सकते है। दुबारा में आपको बता देना चाहता हूँ की ये configuration interfaces पर किया जाता है।
RouterA(config)# interface s0
RouterA(config-if)# ip rip receive version 1
RIP updates triggering configuration
RIP updates हर 30 second में भेजी जाती है लेकिन आप चाहे तो इसे configure कर सकते है ताकि जब table में कोई change हो तब ही routing updates भेजी जाये। ऐसा आप इस प्रकार कर सकते है।
RouterC(config)# interface s0.150 point-to-point
RouterC(config)# ip rip triggered
Troubleshooting RIP
RIP को debug करने के लिए बहुत सी commands available है, इन्हें यूज़ करके आप problem का पता लगा सकते है।
| Commands | Explanation |
|---|---|
| show ip route | इस command से आप routing table देख सकते है। इस command के आगे IP address लिखकर केवल उस router के बारे में आप routing information देख सकते है। |
| debug ip rip | इस command से आप RIP को real time में configure कर सकते है। |
| show ip protocols | RIP protocols के बारे में information देखने के लिए आप इस command को यूज़ कर सकते है। |
| show ip rip database | RIP database देखने के लिए आप इस command को यूज़ कर सकते है। |